Making your pants adjustable with button hole elastic

My Little Plumcake is a Pattern Revolution Blog Sponsor. This pattern was provided to me for free for use in this tutorial. Want to win a free copy for yourself? Enter the giveaway at the end of this post!

Whenever I (gasp!!!) buy store bought clothes for my kids, I always make sure to get pants with buttonhole elastic, especially for my oldest boy since the hand me downs go to little brother who is not shaped quite the same.  I've recently sewed a couple patterns that included buttonhole elastic in the waistband (Retro Glam Skirt and Otto Pants). I decided that I'll probably use it in most every pants pattern I sew from now on to make sure I can get the perfect fit throughout the life of the garment, no matter who is wearing it. As long as I'm doing it, I might as well show you how too, right?

First, there are a couple things to consider with the pants you are going to modify- do the pants have a flat front or is entire waistband elasticized? Do the pants have a separate waistband piece or is the top of the pants turned down to make a casing?

Today I'm working with the Jack and Jill Pattern from My Little Plumcake. They have a flat front and do not have a separate waistband, but if your pattern is different, I'll give you some tips at the end so you can still make the modifications. By the way, this pattern is designed to be fitted through the waist and butt and flare towards the bottom, but my kids both needed more booty room so I sized up. 

First, assemble the pant fronts and backs as directed in the pattern. Do not sew the inseam or side seams yet. Now it's time to mark your buttonholes.

008.JPG

The pattern directs you to turn the waistband under 1/2" and then another 1" to create your casing. You want your buttonholes to end up on the inside of the waistband centered on the casing, so you measure 5/8 down from the top of the pants, and measure 1" in from the side seam on each side. Mark your buttonholes.

009.JPG

Turn your pants piece over and transfer your marks on the back side, then apply 2 small pieces of iron on interfacing over each buttonhole mark.  

011.JPG
012.JPG

Turn your pants back over and make your buttonholes using your sewing machine.  

013.JPG

Don't forget to open your buttonholes with your seam ripper now! It's hard to do it once the casing has been sewn down!  Continue now with the pants construction according to the pattern directions. When your pants are together, make the casing as directed.

015.JPG

Instead of stopping, sew all the way around the casing.  

016.JPG

Add your buttons! 

017.JPG

Using a safety pin, feed the buttonhole elastic through the buttonhole, into the back side casing, and back out the other buttonhole.

023.JPG

Try the pants on your little one, adjust the elastic as needed, and secure with the buttons.  How easy was that???

031.JPG

So, a few things to keep in mind... All patterns are different. If you are using a different pattern that does not have a separate waistband, remember to check how much the casing is turned under (if at all). This measurement determines your buttonhole placement, and you're going to want to add 1/8" to that # and that is how far you measure down from the top of the pants to begin your buttonhole mark.

 If your pants have a separate waistband, you will need to center the buttonholes on the inside of the waistband piece using the same methods.

If your pants do not have a flat front and are elasticized all the way around, you only need one buttonhole. Insert the elastic, pull it through the casing so that the end of the elastic is right next to the button hole, place the button on the fabric directly on top of the end of the elastic and sew it down, securing both the button on the outside and the elastic on the inside. Pull the other end of the elastic the rest of the way through the casing and out the button hole and secure with button.

I hope you found this helpful, Happy Sewing! Now, Enter to win a copy of this pattern for yourself! 

Labor Day Weekend Pattern Sales!!!

Here's a list of all the pattern sales I could find. Feel free to submit sales you find via the comments section below. I will update with new sales whenever I find them!

Terra's TreasuresFriday through Monday, 25% off with code LABORDAY25 at www.terrastreasures1.etsy.com


Aivilo Charlotte: 40% off now through 9/2 at aivilocharlotte.etsy.com with the code LABORDAY2013 or my craftsy shop is already discounted at 40% off. 
http://www.craftsy.com/user/496600/pattern-store


Patterns By Tina20% off Today through Tuesday (ends 9/3) Coupon Code is: LABORDAY2013. My etsy site:https://www.etsy.com/shop/PatternsByTina 


Felicity Sewing Patterns: Bargain Basement Sale at all my shops plus you can save 15-20% with bundle deals. www.felicitysewingpatterns.com


Nimblephish:  30% off everything in store, good through Monday 9/02. Coupon Code is LABORDAY30 https://www.etsy.com/shop/NimblePhish


Tikatuly:  15% off starting tomorrow through Monday, code LABORDAY15  https://www.etsy.com/shop/Tikatuly


Tie Dye Diva:  Reversible Fleece Hoodie Vest pattern only $5 and you can use code BUNDLE to save 25% on any 3 or more patterns too. Friday and Saturday only. 
www.tiedyedivapatterns.com


Funktional Threads:  I'm marking my patterns in my Craftsy shop down 25% for the weekend. Starts tomorrow morning (once I get them edited) and runs through Monday night. http://www.craftsy.com/user/1608408/pattern-store


Ellie Inspired25% off entire shop Friday - Monday. Code LABORDAY 
https://www.etsy.com/shop/EllieInspiredClothes 


Foot Loose and Fancy Free: 25 % off entire order on web site starting now until Tuesday 9/3 till 11PM Use coupon code 25OFF www.footloosenfancyfree.com    "Etsy on Sale" 25% OFF https://www.etsy.com/shop/FootLooseFancyFree...


Rabbit Rabbit Creations:  Buy 2 get 1 free on all patterns. http://etsy.me/Yi324S


Fancy Schmancy: 20% off Total Purchase with code LABORDAY2013  http://www.fancyschmancybyjeni.etsy.com
 

GoTo Patterns:  Coupons on site http://gotopatterns.com/


FairyTale Frocks and LollipopsLabor Day Savings at
www.fairytalefrocksandlollipops.com   --- enter the code: LABOROFLOVE and take 15% OFF your entire order - shop 50+ fabulous independent e-pattern designers in one spot! Happy Sewing!


Charming Ollie:  15% off Charming-Ollie through LABOR DAY with code 15LABORDAY2013 https://www.etsy.com/shop/charmingollie 


Seamingly Smitten:  Start the weekend early!! Save 40% off your entire Seamingly Smitten - sewing patterns purchase today through Monday! Use code: HAPPYLABORDAY40 at etsy checkout. Spoil yourself over the holiday! https://www.etsy.com/shop/SeaminglySmitten?ref=si_shop 


Paco BeanNow through Monday, get 20% off with code: pbtwenty  Valid at pacobeanpatterns.com only http://www.pacobeanpatterns.com


Sew Sweet Patterns: Sew Sweet Patterns is having a end of summer sale! Use code SUMMER for 25% off your entire pattern purchase! 
http://www.sewsweetpatterns.com/ 

Little Lizard King:  Little Lizard King is offering a buy four get one free special from  http://littlelizardking.com/ If you buy four patterns in a single transaction, LLK will send you a fifth pattern free of charge (of equal or lesser value) Please do not purchase the fifth pattern; simply email littlelizardking@gmail.com indicating which one you want free.  Also, Buy our Bubble Skirt for $5 using code: bubbletrouble on www.littlelizardking.com


Millie Rose PatternsEnjoy 15% off Millie Rose Patterns for the Labor Day weekend. Use code LABORDAY.  http://www.etsy.com/shop/millierosepatterns 


5 and 10 Designs : LABOR DAY SALE - Save 15% - off the Five and Ten Designs Volume One eBook this weekend only! Simply use Coupon Code 'LaborDay' at checkout!!!  http://fiveandtendesigns.com/


Too Sweets Patterns: 30% off. http://www.etsy.com/shop/toosweetspatterns code is LABORDAY 


Sisboom:  This PDF Pattern sale will cure your end of Summer blues – We promise! Buy 2 PDF patterns (minimum $20) or more to activate 40% off your entire PDF pattern order after coupon code BACK2SCHOOL is applied at check out.How it works: Buy 2 or more PDF Patterns and get 40% off your entire PDF pattern order! Use coupon code BACK2SCHOOL. So, 2, $10 patterns would be $12, 3 $10 patterns would be $18, and so on!  Please Note: 2 pattern ($20) minimum required to activate sale. Sale ends Monday September 2nd at midnight. Coupon code BACK2SCHOOL will activate coupon code


Cottage Mama: 10% off with the code NEWWEBSITE. It's not labor day sale, so not sure how long it lasts .http://thecottagemama.com/the-cottage-mama-shop/


Everything Your Mama Made: I  am excited to share my first sale!  I don’t plan on having traditional sales often so if your a sale shopper take a second to check this out! Now thru Monday 9/2 at 11:59PST I have marked down all the patterns in the Craftsy shop NO COUPONS NEEDED! Save 10% on all 3 of my individual patterns (on sale for $4.45-$8.95) OR Save 20% off my Dolman Top Bundle pack that includes both the Carlie’s & Kymy’s Dolman Top patterns ($15.90 for $19.90 in patterns).  Not only that, but as a free extra, next week I will be sending out the 18″ doll expansion (.99 value) to all bundle customers to their paypal email! http://everythingyourmamamade.com/2013/08/30/eymm-labor-day-sale/


 imaginegnats: 25% off with code work25 http://shop.imaginegnats.com/


EmmylouBeeDoo: 20% off with code "labor20"  https://www.etsy.com/shop/loubeeclothing 


MonkeysbugNeed a little Labor Day sewing motivation? Use the code LABORDAY at www.monkeysbug.com for 25% off your order of any and all patterns.


Ruby Jean's Closet - Labor Day SALE! Buy two, get one free (of same or lesser value). Just leave me a note at checkout letting me know what free pattern you want. https://www.etsy.com/shop/RubyJeansCloset?ref=si_shop  Sales ends midnight, Sept. 2.

Hailey Bugs Closet: I have my new pattern on sale for $5 for Labor Day Weekend. Here is the linkhttp://www.craftsy.com/.../66781...


Found a sale I missed?

Leave the details

in the comments

and I'll add it to the post!

Happy Labor Day Weekend!


Pattern Organization: Day One

Hello Pattern Revolution Readers, today we are going to start a series on Organizing your PDF Patterns.  Today, we are going to start with a few easy ways to store the paper patterns, and then tomorrow we are going to start talking about digital storage and all the amazing resources out there to back up your files!!!  If you hae your own great ideas for file storage, please share them with us in the comments - we love sharing awesome new ideas.  I hope you all see that there is no right or wrong system, and they they don't even have to be cute and frilly - they just need to work for YOU!!!

------------------------------------

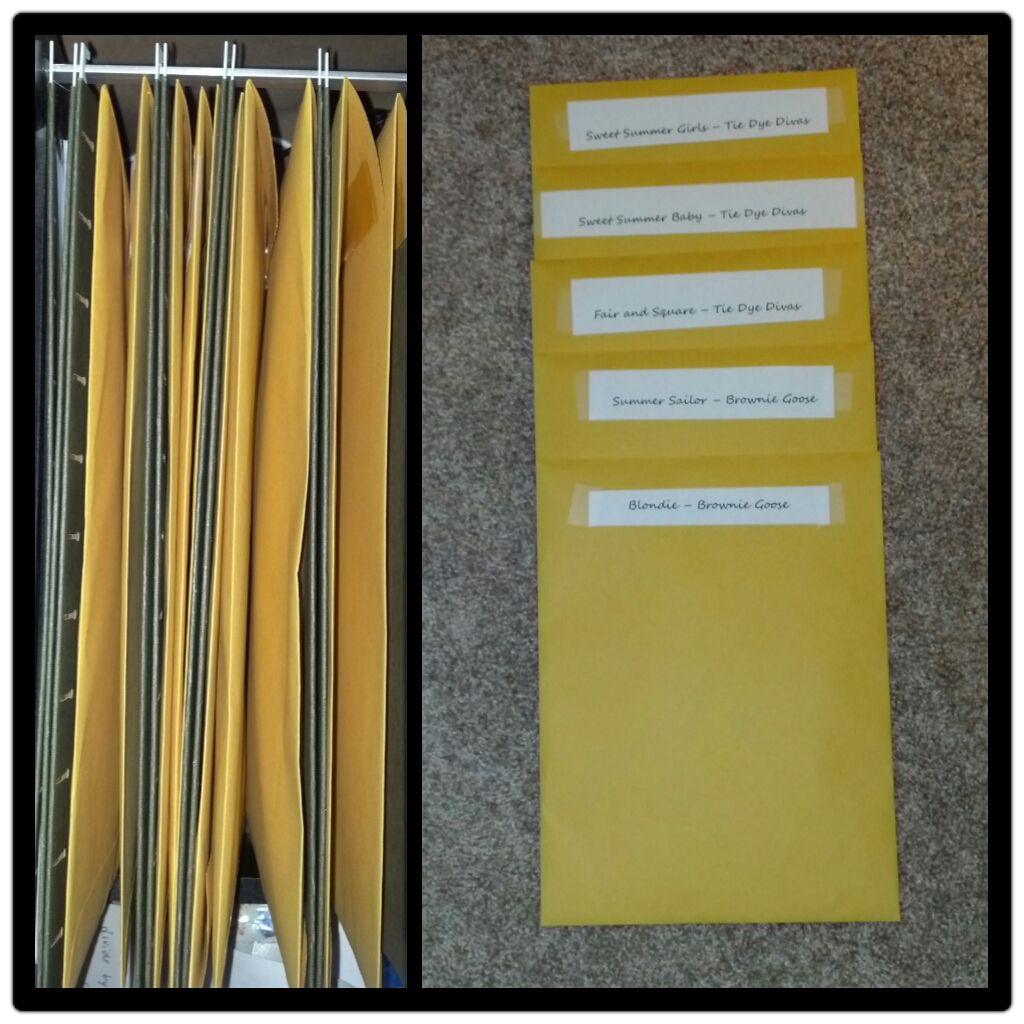
Hi everyone, I'm Kari.  When I first started buying PDF patterns, oh about 5 weeks ago (seriously, was I living under a rock?!), I quickly had to come up with a way to organize my patterns.   So, as I purchased a pattern, I quickly print it out, stuck it in a folder and taped a label on it.  Fancy, huh?  Then, I would stick it in my filing cabinet.  

You can see my hanging file folders on the left.  On the right, I've pulled out just a few to  use as an example of how I label my envelopes.

Okay, confession time.  Buying, printing, sticking in an envelope and slapping a label on is easy and organized.... if you can keep up with it.  Unfortunately, with all the sales and awesomely cute patterns I've seen over the last 5 weeks, I've bought more than I was able to print.  So, I'm a bit behind in my organizational plan, but I am waiting for my ink to arrive (and money, seeing as how I've spent it all on fabric and patterns).  Until then, I will just have to have my envelopes patiently waiting.  

I did organize my computer files though.  I found, once I really started feeding my addiction acquiring patterns that it was hard to keep track of what pattern went to which designer.  So, I created folders for each designer.  Then, I choose the designer I need and save my pattern there.   It's such a time saver when I need to access the instructions!

My method of organizing my patterns isn't exactly a fancy one. I always print the pattern pieces and read the instructions off the tablet or computer, so my method is most effective if you are like me and print just the pattern.

*Thanks Kari!  This is basically how I store my pattern pieces as well - I love that you can either organize the hanging files by designer, or you can organize them by type (boy pants, dresses, leggings, etc...)

---------------------------------------------------------------------------

Next we have Jeanine Thomlinson sharing her method:

I take two pieces of construction paper and tape around on three sides. On the front of my folders I write four very important pieces of information

1. Pattern designer

2. pattern size range printed

3. sized traced and cut

4. any notes on the fit of the finished garment 

To store these "folders" I just line them up in my half of the cupboard (it has doors so no one sees the mess).  

Photobucket

Thanks Jen!!!  I love that by using construction paper you get more space for your pieces.  Also what a great tip to label with the size cut and your notes about the finished garment!!!  So many times I will alter a garment to get a better fit on my babes or to get a slightly different look, and I rarely write it down - awesome awesome tip.

------------------------------------------

Next up is Raedene from Chasing Mermaids sharing a more unique approach to organizing her files!!!

As a seamstress in a sewing business I purchase LOTS of pdf files of patterns. It is always a struggle to determine the best, most efficient way to save all those files. One must consider a few things:

1.Where to I save the actual file.

2. Where do I put the printed pages.

3. How to I organized all those pattern pieces once taped together and rather large..not to mention the multiple sizes.

I sew for my shop daily. I need access to all those paper pieces in all patterns that I sell items from and in all sizes. Folding them up in files doesn't work for me. I need to see them and access them quickly. So I came up with this solution all by myself...with no help from Pinterest!!! First, I had my husband put in a rod across my sewing window in between my two upper cabinets. I needed it sturdy and high enough to hang all those beauties. I gathered metal hangers from my husband's uniforms and some clothespins and hung all the pieces together on one hanger by PATTERN. I organize all the hangers by designer alphabetically. I love knowing all the pieces are right there and as I need a size I trace from the original onto freezer paper and add it to the appropriate hanger. The hard part is being diligent about hanging it back up right away when finished.

I keep all the pages printed from the computer in binders by designer. I have found it easier just to print the pattern pieces and the measurements pages and then just read the actual directions from the computer. Saves ink and paper and is easier to get to. Now, I am off to sew with everything right where it needs to be.

*What an awesome method for shop owners, I'm now wishing I had a pretty space to set this up in ;o)

---------------------

I hope you have enjoyed day one of our series and gotten some good ideas with what to do with all those printed pattern pieces!  Don't forget to share your own ideas with us and join us later int he week for all the info on digital storage.