If you're in the fantastic Facebook Group
PDF Pattern Sales and Promotions, you've probably already seen a whole slew of adorable Delaney Tops that have been posted by members. The Delaney Top pattern is a sweet open back summer top by Astrid Novak of {SIG}nature Creations.
You can purchase it in her Etsy Shop
HERE.
You can also enter to win a copy at the bottom of this post!
Also, don't forget to watch her awesome bow tying video; it's just above the giveaway!
And now, what you all came here for--the fabulous tutorial by Jerrinne Haas!
Hi, my name is Jerrinne.
I’ve been sewing for as long as I can remember. About 5 years ago, I started sewing
children’s clothing for my 2 little girls and 2 little nieces (and all their
little girl friends).
I could probably design my own clothing (I’ve done it a few
times and was fairly successful), but, I’d MUCH rather pay a nice lady (or guy)
to design, size, and test the patterns for me!!! I typically don’t like making modifications
to patterns, but, when I saw the sneak peak of Delany dress, I had to have
it! I loved that adorable little pocket
and the bow tie back. However, here in
Seattle, with all our rain and grey skies, an open back top didn't seem
time/cost effective for me…so, my brain started trying
to figure out how to close the back. I
bought the pattern the day it was released and had completed 2 closed back
Delany dresses by the next morning. My
girls LOVED them.
Late one night, after my girls had gone to bed, I was
enjoying a glass of wine (or two) and I was spending way too much time on
Facebook. I saw that there was lots of
interest in a closed back Delany dress.
I have no affiliation to SIGnature Creations,
but, the pattern was well written and I love supporting small business/work at
home moms, so, I posted a quick picture of my dresses...hoping to inspire and
encourage others to buy and make their own dress. The pictures were a hit! I was asked by Robin Hill (with the blessing
of Astrid Novak of SIGnature Creations) to write a
tutorial on how to close the back of the Delany Top/Dress.
My first version worked fine. These were the very first ones I made and the
picture that I posted on the Facebook group.
I've actually made several since then (and even gifted a
couple). Up until last night, I was
ready to write a tutorial on how to close the back and add a placket (like
pictured above). I even wrote out a
rough draft and took all the pictures…but, they just weren't going together as
smooth as I would like.
So, I changed gears a bit…
This way seems so much “cleaner” looking and was so easy!!! I
love that the size and the shape of the opening, is totally in your
control!!! I absolutely love it and hope
you will too!!!
NOTE: I think this
method will probably only work up to size 5T.
Because the larger size skirts are cut from “selvage to selvage,” there
may not be enough wiggle room in the larger sizes to close up the back. The skirt portion will probably be too
narrow. To close up the back size 6 and
up, you might need to cut another piece of fabric to make a front and a back and
attach at the sides, but, that would require a whole other tutorial.
To get started, cut
the pieces out according to the pattern PLUS a 3” X 5” rectangle from
the skirt material.
Sew the bodice and
pocket as instructed in the pattern (pages 1-14):
 |
| Here is my bodice, skirt, and extra piece |
Sew the skirt together (do not hem the skirt
or add the pocket yet):
1) Fold short ends, right side, together.
(I serged my
ends first.
You can serge, zigzag
stitch, or leave raw…whatever you are used to doing when sewing
seams.)
2) Line up short sides.
3) Pin and sew.
Make the lining/placket
piece:
1)
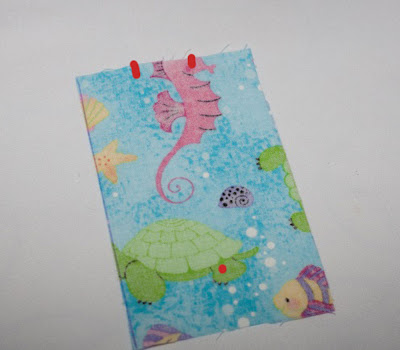
Mark at 1” and 2” on the top of the extra piece of skirt fabric.
You can
definitely make the distance between the two dots wider.
(I would say,
there needs to be at least 1” between the two marks, in order to tie the bow.)
2)
Mark in the middle, 2” to 4” down (depending on how long of an opening
you want.)
***Note: I did 4” for an 18 month dress, but, I think
this is kind of long and will probably use 2” next time. 4” may be more suitable for size 5T.***
3)
You will have 3 marks. Two at the
top and one toward the center bottom.
4)
Connect the dots, making a curve toward the bottom.
5)
Trim the fabric, leaving about a 1” border.
6) Serge/Zigzag stitch around the
edge
Make the Sew on the
“placket” and making the slit:
1) Place the placket on top of the skirt piece,
right-sides together,
at the top of the skirt, centered over the seam.
3) Sew along the line you made in the last
step
4) Clip down the middle of the placket piece(and down the seam of the skirt) that you just
sewed.
Make a few extra clips at the
curve. Be careful NOT to clip through
your stitches.
5) Flip and turn your cut piece towards the
inside of the skirt
7) Turn over
and top stitch around your slit to hold the placket piece
back.
Add your pocket, hem, gather and attach to the bodice
(instructions are in the
pattern)…and you are DONE!!!!
My adorable niece wearing SIGnature Creations, Delany Dress, Size 18 month with the
opening length of 4”
|


