
Getting your Gift Giving on with the Nimblephish Delightful Doll
/Halloween has drifted away into a thing of memory, and now the world gears up for the next BIG holiday - MY BIRTHDAY!!!!!!!!!! Oh wait, everyone isn't excited about that? Well dang ;op Here in the US we are decorating our homes with leaves and cornucopias, giving thanks for our families and friends and bits of creative beauty in the midst of a chaotic world. The rest of the world though - and probably most of you seamstresses, are starting to think about CHRISTMAS. So today, we'll help you out with an adorable and not too difficult sewn gift for all the little girls on your list. My favorite thing about this doll, is the ability to dress and style her just like your little girl! Here are Crystal and Cassie to tell you all abut the Delightful Doll from Nimblephish.
-----------------------------------
Hi Pattern Revolution! It is Crystal, from Stitched by Crystal, here to share my review of one of the newest doll patterns from NimblePhish, the Delightful Doll.
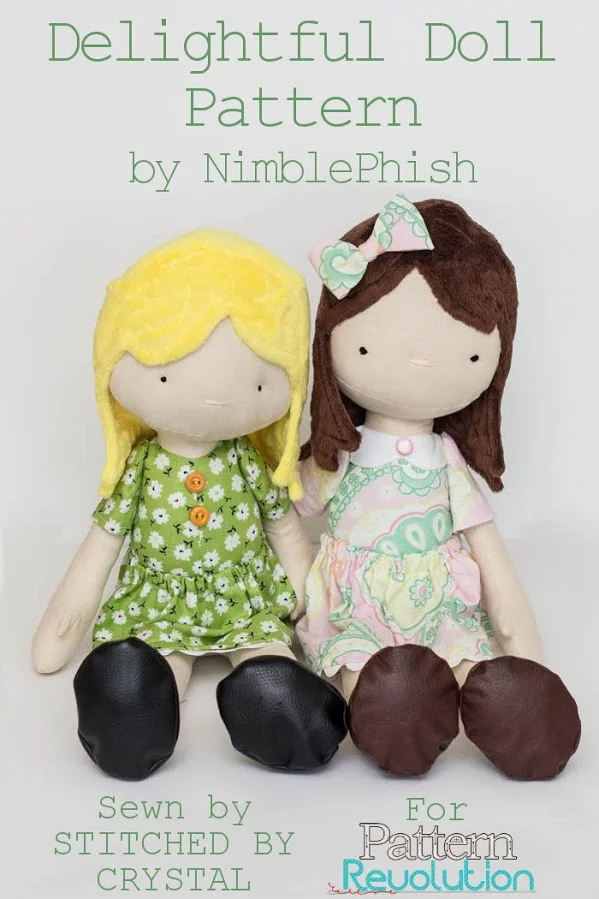

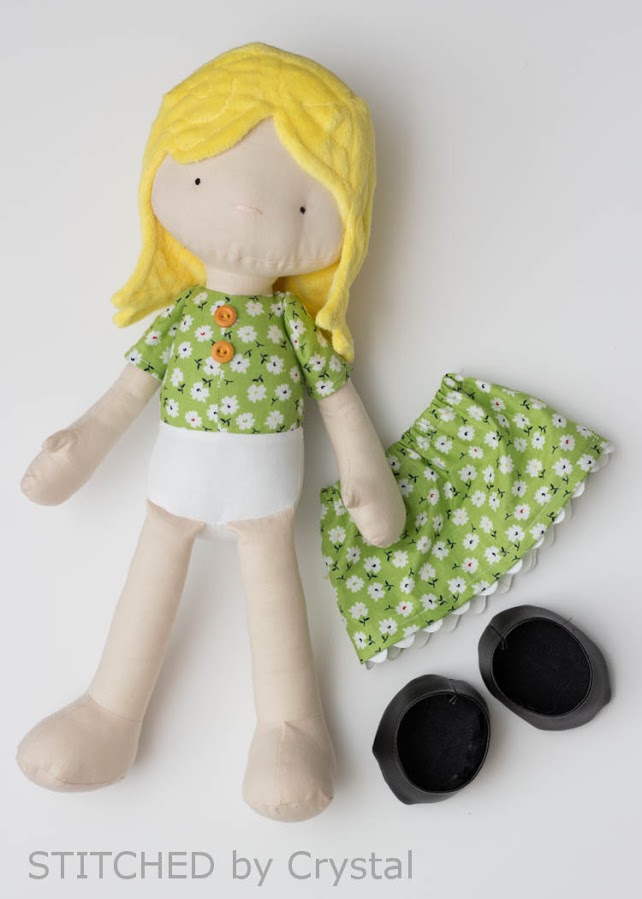
I am a fan of NimblePhish’s cute designs, she has all sorts of stuffed animal and doll patterns. There is something in her shop for all skill levels, and they are all adorable! I have sewn up a couple of them before, like Seamus the Turtle and the Tiny Tot Baby. This new design is a sweet little doll! The finished doll measures about 18” tall. She has button jointed arms and everything else is sewn on, so you won’t need any fancy doll joints. Her face is simple hand embroidery and, unlike some of NimblePhish’s other patterns, she has no face sculpting, so she is a pretty simple sew.

The doll is made of cotton fabric, I used some Kona cotton for her body and some scraps for her dress. The pattern calls for fleece for her hair and felt for her shoes, I switched those out for some plush, minky type fabric for her hair and vinyl for her shoes. The pattern comes with pattern pieces and instructions to make her a cute removable skirt and shoes.
Let me give you all the details on the Delightful Doll pattern!
- Supply list so you can grab everything you need and tips on where to buy if you have trouble finding anything (but the supplies are pretty basic, I found everything I needed at JoAnn’s)
- Color photos for sewing steps
- Tips for sewing and stuffing your doll
- Printable pattern pieces print on 8.5” x 11” or A4 paper
- Notches and marks on pattern pieces so you get everything lined up just right.
- Pattern pieces are clearly labeled and grain/stretch is noted.

I would say this is an intermediate sewing pattern, if you have never sewn a doll before, you may find this a bit challenging. The instructions are clear, but like most other NimblePhish patterns I have sewn, there is no hand holding! You will need basic sewing and embroidery knowledge to complete this project, and as I mentioned above, previous doll sewing experience may be helpful as well.
I completed my first doll in about 4 hours, the second doll took me significantly less time after I had the first one under my belt.
The doll is a huge hit with my toughest critic...my 3 year old!

----------------------------------------
Hi there! Cassie here, of Lily Shine Boutique, to review the adorable and Delightful Doll pattern by Nimblephish Patterns.


Let’s dive into the details of the Delightful Doll pattern:
- printable pattern pieces for all doll parts included
- photos and step by step instructions included as well as helpful tips for doll making techniques
- one size doll fits all
- included measurements and instructions to create skirt, bow detail and shoes

For my first attempt at a doll, this was a great starter pattern. I was a bit lost at steps along the way, but with some more careful reading and some fiddling, I was able to figure it all out! I am a very visual sewist, and would love to have had some more detailed photos for the tricky steps. After scrolling through the Nimblephish facebook fan page I found some great helpful hints and was able to finish the doll with success!


I was able to sew the doll in a few sittings, estimating about 5 hours of “mom time” to complete the doll. For a doll pattern, I would figure this to be a pretty basic beginner pattern but for those new to doll making, I would rate the pattern as advanced. The pattern pieces were easy to print, cut out and trace onto the fabric and felt. I appreciated the detailed labels on each pattern piece, including marks for turning, darting and notches to help get things aligned correctly. My oldest is requesting a doll for her upcoming birthday, so I better get back to sewing!!!


